
Here are some more detailed steps to help you build MobBob V2.
-
Get the non-3D-printed parts.
You need:
- 4 x 9g servos
- 1 x Bluno Beetle (see note below)
- 1 x Eneloop Phone Battery Extender (see note below)
- 1 x Nexus 5 (see note below)
Acquire the 9g servos, Bluno Beetle, Mobile Battery Booster, and find a phone you want to use. The phone needs to support Bluetooth LE (Bluetooth V4, I believe).The servos can be found cheaply on eBay, or places like DX.com.
I got the Bluno Beetle directly from DFRobot’s website.
I got the Eneloop Battery Booster discounted for about $7! 😀 If you want the same one, try searching “Eneloop Mobile Booster” on ebay. This model should come up. However, if you have a different battery booster, that will mostly likely work fine too!
-
Make sure the app will work with your phone.
Download the app from Google Play and test it on your phone to make sure your phone supports the voice recognition and computer vision features.
https://play.google.com/store/apps/details?id=com.cevinius.MobBob
You can use the “Skip Connection” option in the app if you don’t have your Bluno setup yet.
If the voice features from the voice search in Google Now works, you should be good. And, if you have a working front facing camera, you should also be good!
- Prepare the STL files to print.
Download the MobBob V2 STL files from Thingiverse and prepare to print them.
http://www.thingiverse.com/thing:990950
If you are using a different phone to the Nexus 5, or are using a different Mobile Battery Booster, you may need to adjust the STL files for the phone holder and for the battery rack.
If you are adjusting them, keep the mounting holes the same so that the adjusted parts will still fit on MobBob V2.
- Print the 3D printed parts.
The parts should be pretty straight forward to print. The phone holder is probably the trickiest part. You will probably need to use supports to print that part.
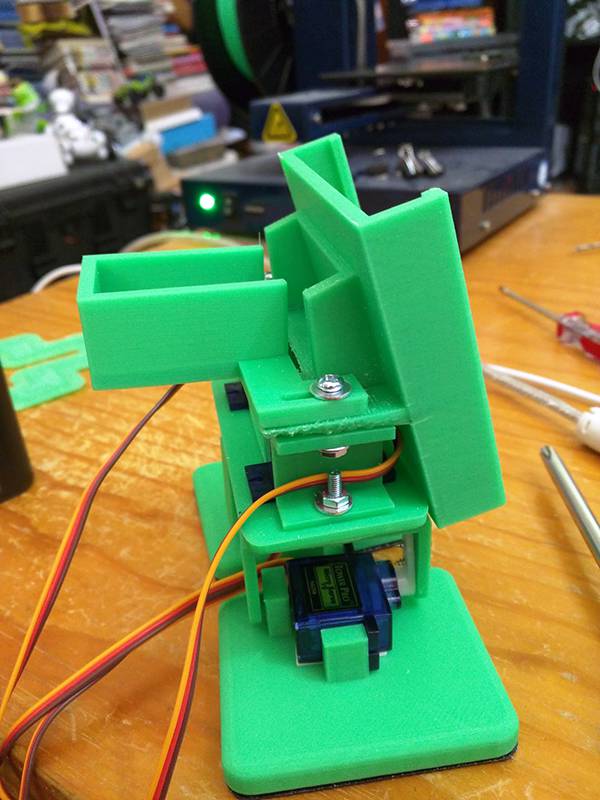
- Assemble MobBob.
- Center the servos. (This is important!!)
- Attach the servo horns to the leg parts.
- Fit the hip servos to the “Base” part and strap them down the using the “Servo Brace” part. Use M3 nuts and bolts to hold them together.
- Stick the feet servos to the feet pieces. I used thin double-sided foam tape to do this.
- Use the leg pieces (with servo horns fitted) to connect the hips to the feet.
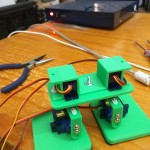
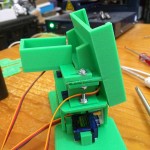
- Attach the battery rack and the phone holder using the outer mounting holes. Again, use M3 nuts and bolts to do this.
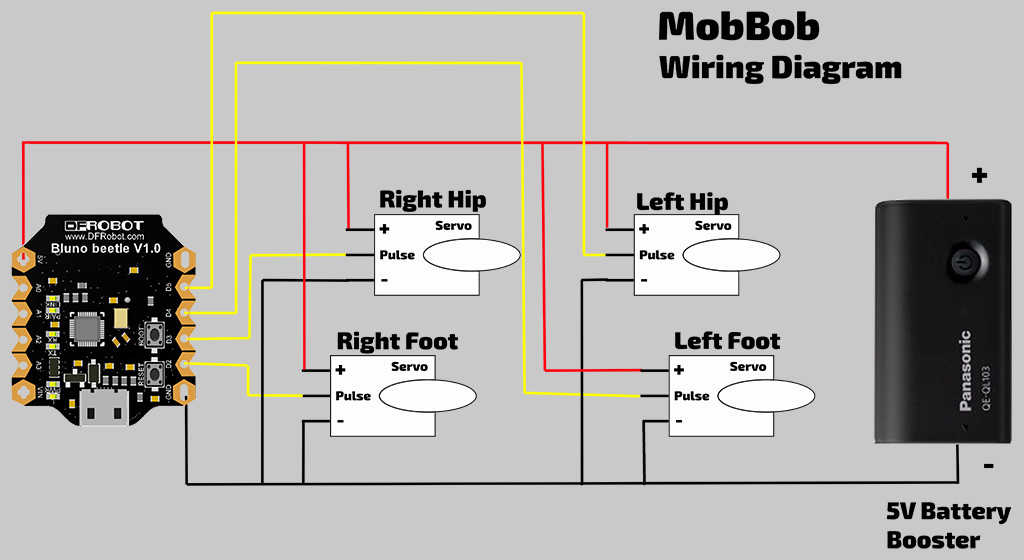
- Wire up MobBob.
Following the diagram here:

Note that the wires do not come out of the servo in that order! Usually:
The “+” wire is red and in the middle.
The “-” wire is black or brown.
The “Pulse” wire is usually yellow. - Configure the Bluno Beetle’s Bluetooth.
The default Bluno Beetle’s Bluetooth settings are fine for MobBob.However, I’ve experienced a case where a new Bluno Beetle’s bluetooth settings were either not initialized or were corrupted. As a result, I had trouble connecting to the board, and when I was able to connect, the connection would be lost shortly after.
I found that resetting the Bluno Beetle’s bluetooth settings to their default values fixed this problem. So, to be safe, I suggest always doing this step on a new Bluno Beetle board to reset the Bluno Beetle’s settings before loading the MobBob Arduino program on.
To do this, you need to execute the AT command “AT+SETTING=DEFAULT”
There are detailed instructions on how to do this at the DFRobot website: Link(NOTE: To use AT commands, the serial port can’t be in use. Because MobBob’s Arduino program uses the serial port, if you want to do this after you’ve loaded MobBob Arduino program on:
– Load onto the Arduino a basic program like the Arduino “Blink” example. (This will replace the MobBob Arduino program on the Arduino.)
– Follow the steps in the link above to use the AT command.
– Go to step 8 to load the MobBob Arduino program back on.) - Install the Arduino Code onto the Bluno Beetle.
Download the Arduino code from GitHub:
https://github.com/cevinius/MobBob
You may need to adjust the Arduino pin constants if you wired MobBob differently.
You may also want to tweak the servo centering values and and the servo range values.
Transfer the code to the Bluno Beetle.
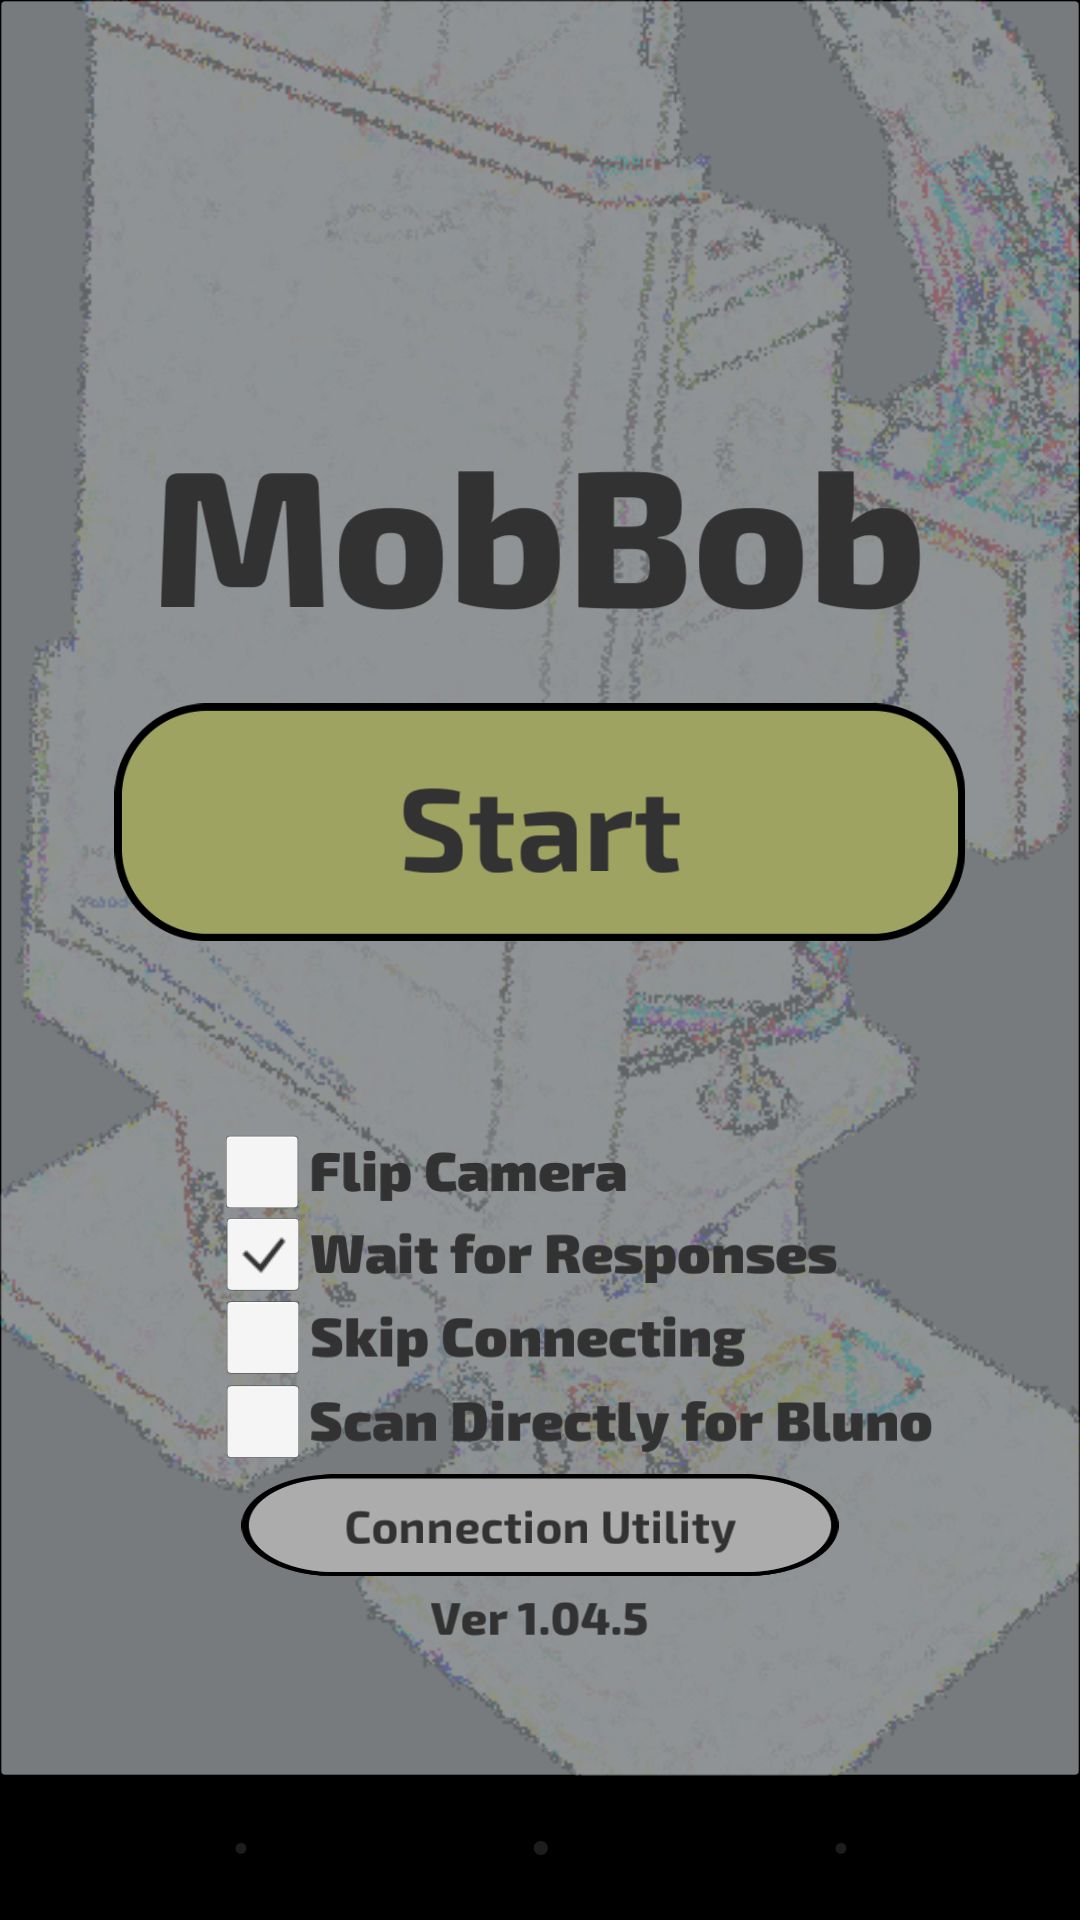
- Fire up the app.
Depending on your phone, you may need to play with some of the options on the front screen.
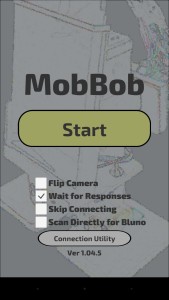
If connections are not working reliably, try the “Scan Directly for Bluno” option.
If the camera view is coming out upside down, try the “Flip Camera” option.
If you find MobBob stops responding after one or two commands, try unchecking the “Wait for Responses” checkbox. When that checkbox is selected, the app will wait for response codes from the Arduino to determine when animations have finished playing (i.e. when MobBob is ready to receive a new command). Without that checkbox, the app will stop relying on these codes and will just use an estimated “timer” to determine when it is ready to send another command. Using Response Messages is more accurate and better, however, some MobBob builders have told me that they have issues receiving the responses on their phone. (This was reported on some Samsung phones). So, if you find that MobBob stops responding after a few commands, try unchecking the “Wait for Responses” checkbox.
(Note, there is a bug where you may need to close and re-open the app for some of the values like the camera flip value to stick.)
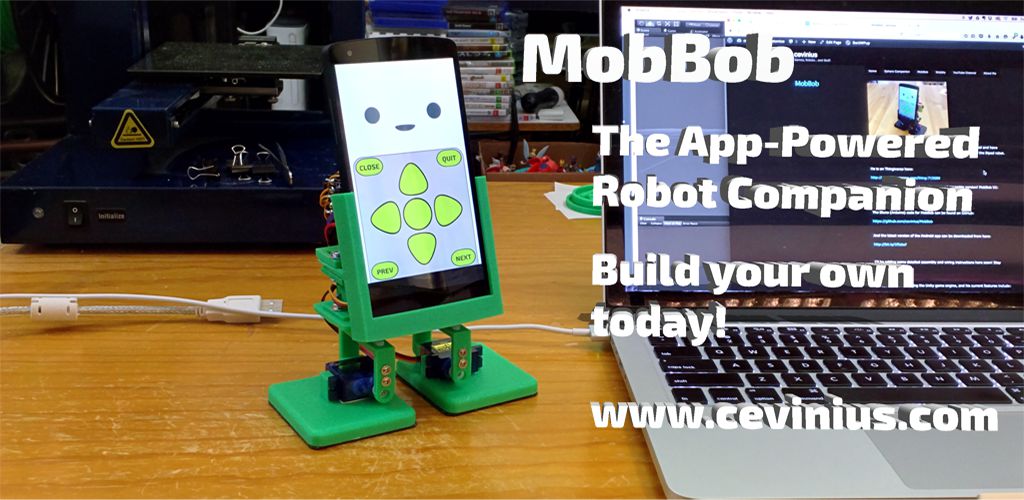
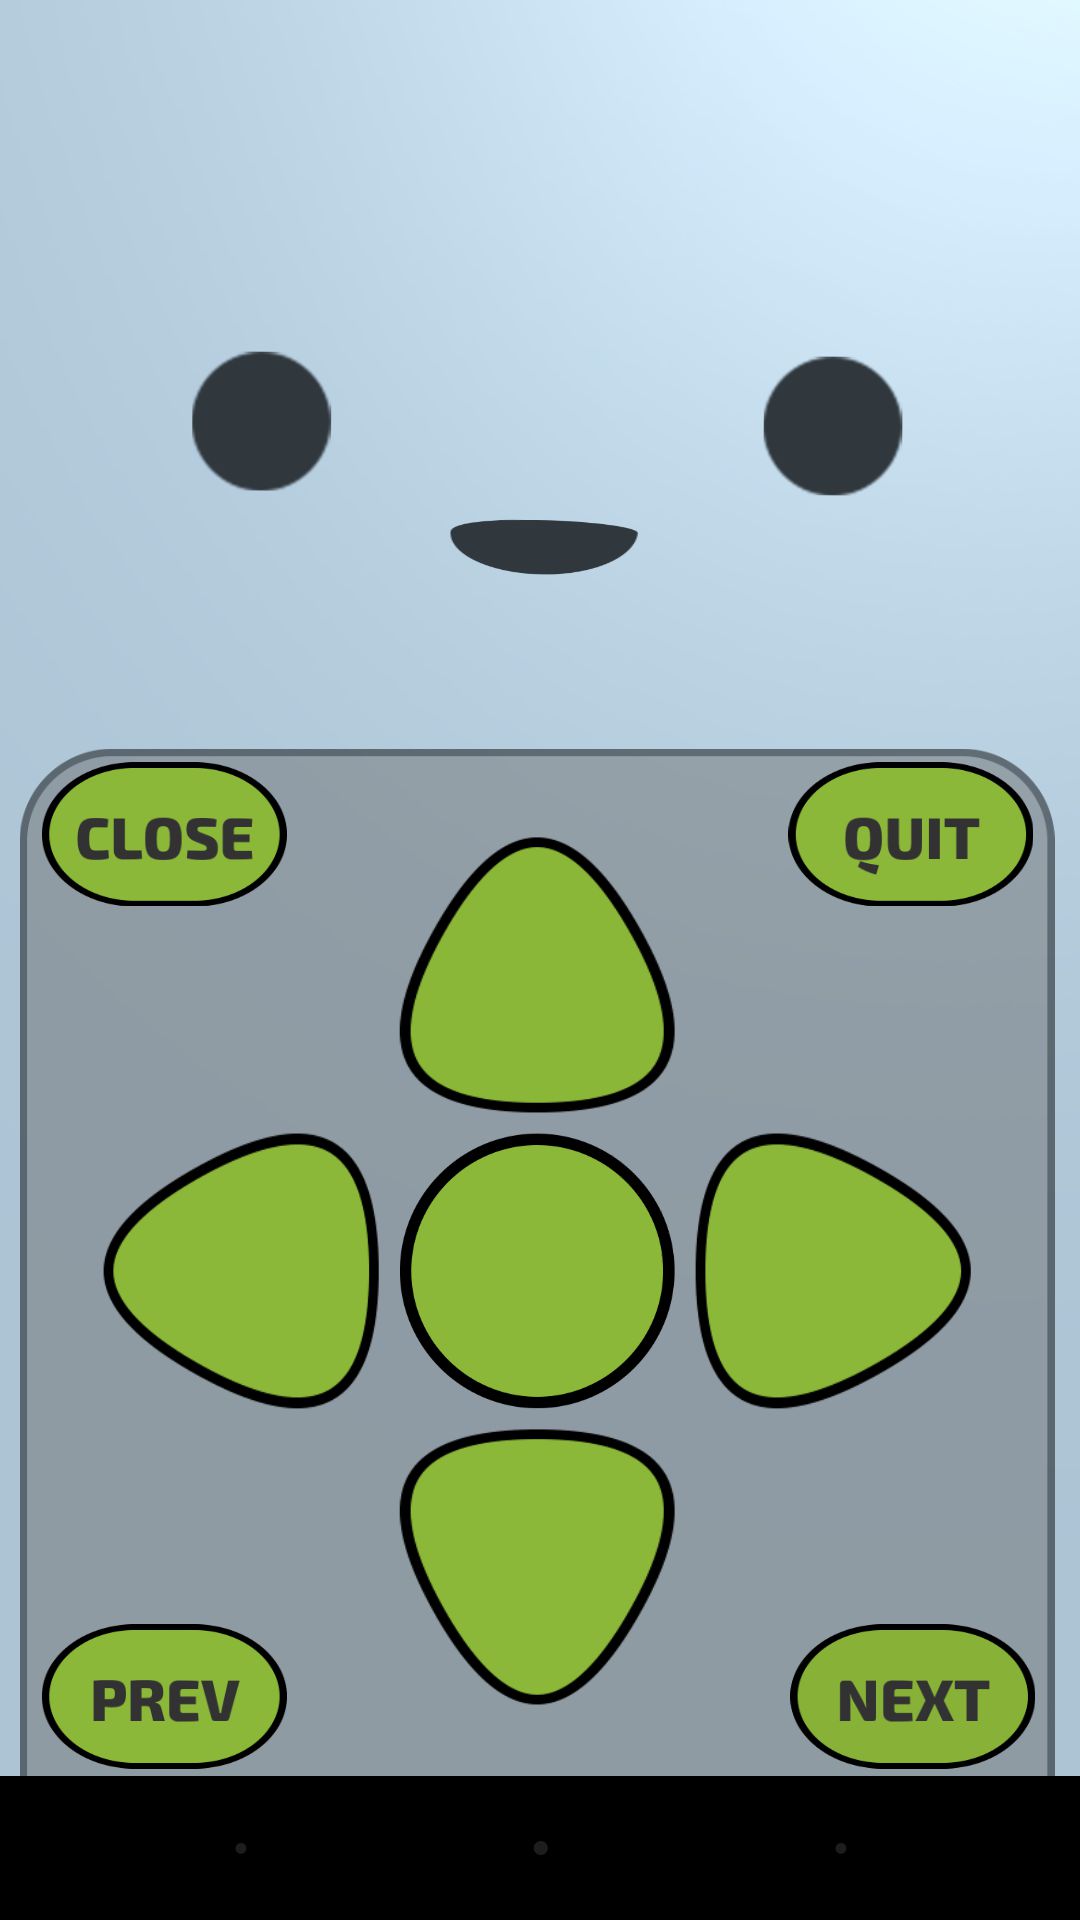
- Have fun with MobBob.

That’s it! MobBob is ready for you to play with… and then hack and extend. 😀

Hi,
I’ve Center the servos, but I need to adjust the servo trim? is it possible?
Yes. There are variables near the top of the code for setting the centres and also what the Max and Min for each servo is.
There is also a value there to control for much to move in the walk animations.
You can tune it for your hardware using that code.
You can drive it from the computer using USB to speed up test. One of the MobBob videos on my YouTube channel demonstrates that.
I’m not at the computer at the moment so can’t send links or look up variable names easily.
Let me know how you go.
These are values in the Arduino code, just to confirm.
Hi cl3m,
Can you please tell me how to center my sg90 servo?
To center the servo, you should connect the servo to your arduino (or other microcontroller), and run a simple program (like the example included in Arduino) to move the server to its center position. That will show you where the servo thinks is the center, so attach the servo horn as required based on that position.
Ok, I’ll try.
ok no problem I think I can do it.
Thanks for your help
Could you share android app codes ?
Thanks
Hi Josef,
I can’t share the app code unfortunately. It contains some third party (non open-source libraries), and also contains some proprietary code from my company (Robot Circus).
However, I am planning to write some tutorial on my approach with Unity to help people create their own apps.
Thanks,
Kevin
Hi cevinius! Congratulations, excellent work! I´d like to suggest you put some code into your app to allow the bot stand by idle. If no stimulus is received, bot could do a ramdom movement like shake legs, walk a little distance, talk something and so…
Great idea! I’ll add this in for the next update!
Not sure if anyone has asked this but will you be releasing an app for the iPhone to use with MobBob?
Hi Alvaro,
I will be, but I need more time to work on it! Currently, everything works on iOS except speech recognition… I want to get that part working as well before I release it. Hopefully soon…
Thanks,
Kevin
Hi Kevin,
I was finally able to get it to work, I borrowed my friends nexus 5 and played around with it a bit, it was so much fun, thanks for the instructions and help. Let us know when you have the iphone app available I would love to try it on that since thats my current phone :).
Hi Alvaro,
Thank you for the update!! That is fantastic news. 😀 I’ll definitely let you know when the iOS version is ready!
Kevin
Good day here in south Africa we on have bluno nano would the code be the same as for beetle and how do I wire up to nano board .
Hi Ian,
All the best for your build.
The software will work with the Bluno Nano. I used a Bluno Nano in my first version of MobBob. It’s a nice board. 😀
The wiring for the Bluno Nano is the same. There are labels on the Bluno Nano pins with the same names as the ones in the Bluno Beetle diagram.
Let me know how you go.
Kevin
Thanx lots just one more thing I’m using Vodafone smart grand v696 with loli pop 5.1 would it work I did download the app and tested it does it only work with red ball can’t seem to pick up any thing or different color.Many thanx
The app should be able to focus on different colours if you play with the slide bar in the UI (which sets the hue it should look for). Note that the code specifically looks for balls (it detects round objects), so it won’t follow/identify other shaped objects. Also, it’s good to use a colour that doesn’t naturally appear elsewhere in the environment (so colours like hot pink are good). Also, depending on the quality of the camera, lighting is important. Good, bright lighting will help.
Hi there sorry to bug again is there away I can get the 3d printed parts from u guys here in south Africa there is no one that can print them for me I got everything except the printed parts.
Hi Ian,
I could help… but not for a while. I’m making a few already for a local museum and another friend, so I won’t have time to do it for a while.
Can I suggest asking at http://www.RobotRebels.org ? It’s a robotics web community that I hang out at and a lot of people there are into 3D printing. Someone there might be able to help sooner.
Hi there again got parts printed but I think I fryed my bluno so I was wandering could I use arduino nano v3 with Bluetooth hco6 module and would I wire it the same as bluno and could I use same code many thanx
Hi Ian,
Yikes. I’m sorry to hear about the fried board. 🙁
Yes, it should work with a nano and a HC06. That is pretty much the exact setup I used in this video: https://www.youtube.com/watch?v=Ykxdeoo8vkQ
The wiring is almost the same. You will need to connect the Bluetooth module to the 5V and GND pins to power the module, and then you will need to connect the Bluetooth TX pin to the Nano’s Software Serial RX pin (check which it is in the Arduino code), and connect the Bluetooth RX pin to the Nano’s Serial Software TX pin (check this in the Arduino code too).
The code for this version is also on Github: https://github.com/cevinius/MobBob/tree/master/ArduinoCode
All the best with your build.
Kevin
Ian
I am also using Arduino nano V3 with HC-06. But I cannot connect my samsung S8 phone with HC-06.
How is your robot? Is it successful?
Hello,
I’m french Guy and I’m about to start Mounting your incredible small robot.
Is there a way to chance Language and switch to french for exemple 😉 ?
If you need translations, I can send you text and mp3 sound files.
Thanks for your answer
Olivier
Liberté Fraternité Égalité
Hi Olivier,
It will take some investigation and work, but may be possible down the track. At the moment the parsing logic needs to be updated in code. I have plans to make this more data driven. I.e. Read the logic from a data file. I’m hoping that will make it possible for different versions of the file to be created for different languages. However, it’ll take me a little while to get it done (since I have some other features to finish first). It is on the to-do list though, and I may need help translating when the time comes!
Thanks,
Kevin
Thank for your answer Kevin,
Just E-mail me if you need help for the translation.
PS : my 3D printer work at this time to do the parts…
Have a nice Xmas and an happy new year !
Olivier
Hi Kevin,
thank you for sharing jour work !
I am also in if you need help to translate app in french !
All the best
Ludo
Thanks, Ludo! I really appreciate the offer! I’ll post an update when I have the language stuff split out.
Kevin
Good day every thing works great expect when i tryed to use normal hobby servos but then they just shake with no movement is there a reason why normal servos dont work and or do only 9g servos work.
Full-size hobby servos should work too. I’m guessing it’s a power issue. What kind of battery are you using? Are they getting enough voltage/current? (A phone extender battery like on my builds probably won’t be enough for hobby servos.)
With hobby servos, I would probably use a good Li-ion or Lipo battery.
It may be worth confirming you can drive the hobby servos one at a time with a simpler example Arduino program.
Let me know how it goes.
Hi there i am using 6v 1600ma ni-mh could that be the problem?
I don’t know for sure… That battery may be OK, but it’s possible it’s not supplying enough enough current.
I think you should try more things first.
Check if you can drive a single servo. That battery should be fine for one servo. (E.g. Run the example program from the Arduino Servo library.)
If it’s not working for 1 servo, maybe there is some error with how things are wired? (E.g. Confirm the servo is getting power directly from the battery.) Also, maybe try powering the servo with the battery and powering the Arduino from USB.
If it’s working for 1 servo, but fails for more servos, maybe the current draw is too much, and the microcontroller is resetting because it’s not getting enough current.
You’ll need to do some debugging and tests to figure out the cause.
Thanx will try the other first and make sure there are power thanx for input.
cevinius
I am using Tower Pro SG 90. battery is 5V, 8000mAh. But my micro servo is not working.
I have done AT+SETTING=DEFAULT on beetle. But it sometime can connect and sometime cannot not.
Could you please give some suggestion?
Thank you very much
Hello,
I completed assembling the mobbob v2. I downloaded the Arduino 1.6.7 program. The board I’m using is a Bluno Beetle. In the Arduino program, I selected Board: “Ardiumo/Genuino Uno” and Programmer : “AVRISP mkll”
The code compiled and uploaded to the Bluno Beetle. Then the legs go into the most upward bounce position and want to keep going. I’m afraid the servos will burn out. Is there something I’m doing wrong? Also can’t get the bluetooth to communicate.
Thanks for your assistance!
Hi Dana,
It sounds like maybe the servos aren’t centred.
Were the joints mounted such that the servos are at their centre positions when MobBob is standing straight?
When the program starts up, it tells all the servos to move to their centre positions. So, it the feet are moving up, it could be that foot was assembled with the servo at a non-centred position.
With regards to Bluetooth, what phone are you using? Does it have Bluetooth LE (Bluetooth v4) support?
Let me know how you go.
Thanks,
Kevin
Hi Kevin,
Yes, all 4 servos are mounted with the arm at the center position. I’m using an LG G Flex smartphone which has Bluetooth LE.
FYI, I copied all of the code to the Arduino app. Was I supposed to leave some of it out?
Thanks,
Dana
Hi Dana,
Can you triple check the centring? I still think it sounds like a centring problem… You mentioned that you mounted them with the arms in the center position… That sounds like it could be the problem. Note that on the feet, the horns should at at right angles when the servo is centred.
i.e. The servo should be centred (no horn attached), then mounted to the horn to make the feet flat; This would result in the feet servo horns being at 90 degrees from the servo when the servo is “centred”.
(If you centred the servos, mounted the horns straight, then twisted the horns 90 degrees (mounted) to get MobBob into his standing position, then the servos are not centred when MobBob is standing.)
We want the servo to be centred when the feet are flat, so that the feet have the range of motion to move both up and down. If the power is off and you are careful, you should be able to move the feet manually to check the range of motion. Can the feet be manually move all the way up and all the way down?
Yes, all the arduino code should be included.
Kevin
Hi Kevin,
I tripled checked the servo centering without power being applied and it’s correct. The way I did it was to rotate the servo gear back and forth until I found the center. But what I finally did was power the servos up, then repositioned the servo arms to line it up with the feet flat and hips pointing straight and that solved the problem. A couple of servos are slightly off center and I’ll probably play with the program code to fine tune them.
I briefly got my LG G Flex smartphone to communicate with the Bluno Beetle’s bluetooth and actually got the mobbob app to control the robot. But now it’s not working. Something going on with the bluetooth pairing. I posted a public note on the Bluno forum for advice.
So thanks again for your help on the servo centering!
We’re trying to get a 3D robotic program off the ground at our school district.
– Dana
There are no words to describe how boducioas this is.
Hi, cevinius
I have center the micro servo and connect the servo to beetle following your wiring diagram. I did not fix micro servo to any 3d printing part.
When I connect beetle to phone and tried to use phone to drive micro servo, servo have no response. The connection of beetle to phone some time have and some time cannot.
Do you have any suggestion? Really want to get this project done.
Best Regards
I suggest testing without the phone first. Connect the arduino to the computer via USB, and send the commands over the serial connection. You may need to adjust the code a little bit to do that. That way you can check if the robot is working before looking into whether the Bluetooth is working.
Hi Dana,
That is great news that the centering is sorted now! 😀
This is just a guess… but with regards to the connection dropping out… How are you powering MobBob? Does the battery provide enough current? This is a guess, but potentially, when the servos move, they may draw most of the current, which could leave the Bluno without enough… that might cause it to reset and disconnect. Again, this is just a guess, but thought I’d mention it in case it helps.
Thanks,
Kevin
Hi Dana,
I just saw your post on the DFRobot forum. You should not need to pair if you are connecting via Bluetooth LE. (You only need to pair when using regular Bluetooth.)
On another note, I recently built a new MobBob for someone and I’m having some similar connection issues. I’m not sure if it’s this specific board or something else, but if I find out anything as I debug, I’ll post here.
Kevin
I am having trouble figuring out the wiring diagram.
How do the the servos connect to the power supply? Do I connect all of the servos directly to the beetle or do I splice a wire and connect them to the power wire?
If anyone can help or post pictures to help me with this I would appreciate it.
Thanks,
Ryan
I usually twist and solder the servo power wires together with the wire from the battery. Then I splice a wire from the bundle to the Bluno.
I then solder the servo control wires to the Bluno.
Hope that helps.
Hi cevinius,
Congratulations for your project. It is really awesome. I have one doubt; How can I send commands via Bluetooth from another platform (not android)? Is there documentation for that?
Best Regards
Pablo
Spain
Hi Pablo,
Thanks for the message!
There shouldn’t be any issues with sending commands via another platform. The commands are all text-based and should be quite easy to send. It depends what bluetooth board you are using. I think the documentation from the bluetooth board manufacturer should have details/examples on how to connect from different devices. The MobBob commands are detailed in the comments in the Arduino code. Hope that answers the question.
Thanks,
Kevin
Completly! Thanks Kevin and sorry for not reading the code before asking. Great documentation! I am trying to connect it to Raspberry Pi 3, since it has Bluetooth LE.
Best Regards
Pablo
Hi Pablo,
That is exciting to hear!! Please post some video and images when you get it working with the Raspberry Pi 3! I would love to see that.
All the best with your build. 😀
Kevin
I’ve been working on the robot. It communicates with android via these commands included in the Arduino Program (, ,…). But I’m having problems with the communication with Raspberry. The bluetooth program in the Desktop detects and connect with Bluno Beetle, but using commands I receive messages saying that “Host is down”. I think that the problem is the protocol but need some information about your program send messages or connect with Bluno. Could you tell me something about this?
Regards
Pablo
Hi Pablo,
I just made a post with more info about Bluno communication. Let me know if that helps!
http://www.cevinius.com/2016/08/17/serial-communication-with-the-bluno-using-bluetooth-le/
Keep me updated with your progress!
Kevin
Felicitaciones, Cevinius; me gusta tu proyecto…. no has mirado la posibilidad de sacar la aplicación android en ESPAÑOL?
seria muy bueno; para así disfrutar mas de MobBob nosotros los Latinos¡¡¡¡
Hi Julian,
Thanks for writing. At this point the app doesn’t support localisation. (The voice recognition logic was written around English grammar constructs.) This is something I want to include in the future as I have had some queries about a French version as well.
However for now, I’m focused on refactoring the communication code, and also on adding new interaction behaviour.
I’ll definitely keep Spanish in mind for when I’m ready to start localising the app.
All the best.
HI there! Have you had time to complete the IOS version of the software yet? My 10 year old has been building your robot but we only have iphones.
Hi Jennifer,
I still need some more time on it, but it’s coming. I am planning to add some new things to the iOS to make up for not having voice recognition (for now). I should be able to get something up in 2 weeks, but I’ll see if I can get some work done on it this weekend… (My work is in a busy period at the moment. We’re preparing to show our new game at PAX Australia.)
Sorry about the delays.
Kevin
Hi Civinius, I would like to know if you have how I can make his app in portugal brazil? Does the robot speak Portuguese?
Hi Lucas, The app only supports English currently. It would need significant rework to support other languages. Speaking other languages isn’t too hard, but modifying the parser to understand different languages is harder. I am planning to rewrite the app from scratch to tidy things up and also to add new features. I’m planning to make localisation possible in that version. For now, I’m afraid I can’t help with this. All the best!
I used arduino nano and HC-05 Bluetooth Module did it work…??
You use Bluno Beetle ..Its to costly …
It should work. I used a Nano and an HC-05 (or similar) board here: LINK
Tank you…You are so help full…I am a engineering student of India..This a osom project I seen..You help me to made a face tracking robot using android and arduino..??
All the best for your project!
Hi cevinius,
Congratulations for your project(MobBob).It is really awesome.
“MobBob is a walking, talking robot with voice recognition and computer vision.”
I have one doubt; Doesn’t it include voice recognize?Why can’t App voice recognize ?
Best Regards
kmimax
Why is there no response to running App voice recognition?:(
The device needs to be set on English in order for the voice recognition to work. The app uses the google voice recognition functionality. As a test, see if English language is working on features such as google voice search. Hope that helps.
Wo,Does that mean you need to link to the internet?
Yes. It makes use of the Google services for voice recognition, so it needs the internet for that feature.
Hi I was just wondering if the eneloop battery is NEEDed for the MobBob to work. If it is could you give me an amazon link to one of those batteries as I am having extreme difficulty finding one. Thanks! 🙂
It should work with any Battery Booster style battery. But make sure it’s a larger one that delivers enough current. The servos, etc draw quite a lot of current, and some of the very small battery boosters just don’t supply enough juice.
You may need to adjust the battery holder part, and make sure MobBob can still balance! But otherwise, using a different one is totally fine!
All the best with your build.
Thanks so much!!
This might be a stupid question but when we are attaching the wires from the motors to the bluno beetle do we solder the wires to the board?
I usually solder them onto the Bluno, but if you want to be safe, you could solder wires/pins on to use the Bluno with a breadboard or a PCB.
Hi,Busy people, as you have encountered.
“As a result, I had trouble connecting to the board, and when I was able to connect, the connection would be lost shortly after.”
Set according to your instructions did not solve the problem.
A bit disappointed:-(
I have the similar problem as yours. Did you manage to solve?
Hi, please where i can find the app or apk. to the cellphone?
Hi there,
The app needs an update to stay on the Google Play store (it got removed from there since it got out of date with Google’s requirements), I’ll try to get that organised or will put the APK somewhere for you to download.
Best regards,
Cevinius
Is there anywhere we can download the app or APK files. Trying to build this little project again. was fun to keep the kids entertained.
Hi Cliff,
The app is not currently on the store since Google needed it to be updated, and I haven’t had time to do that due to work. At the moment, I’ve put the APK here. (You can sideload it to your device.) [DropBox Link]
I haven’t tested it in a while, but hopefully, it is still working OK.
Hello,
Does anyone have the part number for the Eneloop Phone Battery Extender? Trying to find one and have a hard time.
Thanks,
Bradb
I’ll see if there’s a model number on the case.
Hey! thanks for this, it was just what I needed to get started on my project!
BTW, this website has no signing certificate and only uses http, I recommend using this and switching to https.
https://letsencrypt.org/
Hi,cevinius. It is a awesome project and I try to build one. Can i use 2 pcs of 18650 battery instead of Eneloop Phone Battery Extender? 2pcs of 18650 battery is 7.4V. Will it burn the Bluno Beetle?
I wouldn’t recommend using 7.4V directly to the Bluno. You may want to step down that voltage first.
So you connected two 3.7v battery in series and then step up 3.7v to 5v, is it correct?
Hi Cevinius, I’m trying to use arduino pro mini 3v3 since bluetooth HC-05 working with 3v3 and for servo I use external power 5v. Is there something that I need to tweak on the code to make it work?..
I have test it directly from pc and it still didnt work, is it something that I missed? :'(
Ok its work now. With pro mini 3v3 I need to setup the bluetooth baudrate lower. Is not work with higher baudrate 🙁
I’m glad to hear it’s working now.
Wira
i also use separated 5v battery for 4 servo, however when I used apps to control 4 servos, they do not move. My handphone can connect to HC-05. i am using Nano and HC-05
My email is lis_wang@hotmail.com
Hi Cevinius
I use Arduino Nano and HC-05. I can connect to my HC-05 to my Android phone. However, my 4 servos did not move. I used 5V, 8000mAH battery to supply power for 4 servos and 2pcs 18650 battery (7.4V) to supply power for Nano.
I tried for 2 month already and cannot solve the problem. Could you please help me?
I suggest first checking that the Nano is able to move the servos. You can modify the arduino code so that it receives the commands from USB-serial instead of the HC-05, and try sending the commands from your computer (via the Arduino software) That will help you determine whether the arduino/servos/battery are working correctly.
Once you have confirmed that, then you can debug whether the HC-05 is receiving data correctly. Again, you may want to create a simple Arduino sketch where the arduino echo the data that it receives from the HC-05 to the computer over USB-serial. Then you can try sending data from your Android phone, and see if the HC-05 is actually receiving it. There may be issues with the baudrate, or other issues.
It’s best to debug these things separately first.
Dear Cevinius
Thanks for your suggestion. I will try it.
Dear Cevinius
Thank you so much and I finally can make it with Nano and HC-05. My previous problem is due to the baudrate. My baudrate is different from your baudrate setting in your code.
I will try with Bluno Beetle.
Really appreciate you shared such awesome project.
Best Regards
Hi Lisa,
That is great news. I’m happy to hear it’s working now!
When I used the voice recog test, it can recognize my voice command such as turn right and move forward. However servo cannot move. Why?
Best Regards
I suggest debugging it separately in same way as before. Check what command the Arduino is receiving from the app. And then check that it works when you execute that command manually.
Also, from memory, I think the code does not start new movement/animation until it has finished the previous one. (Interrupting an animation midway can cause it to be in an unknown/unstable position.)
Thanks. I will try it
Hi Cevinius.
Could you tell me how much cost print the 3d parts please?
Im doing a job and I need that information
Hello
I’m trying to install apk in new android mobile without success due to the version of apk is too old. Can you share the source code of the app to allow me update it to newest version of Android?
Hello, how are you?
I’m interested in translating the app into Portuguese, but I noticed you haven’t made the source code for the Android app available. Would you be willing to share it?
Thank you in advance.